Web
[WebSocket] 소켓으로 채팅 구현하기
전개발
2023. 7. 2. 04:35
개요
- 기본적으로 HTTP 통신은 ,클라이언트 요청에 서버 응답 형태.
- 서버는 수동적으로 응답만 하며, 능동적으로 클라이언트에 먼저 데이터를 전송할 수 없다.
Socket 통신은?
- 클라이언트와 서버를 연결하고 실시간으로 통신이 가능하도록 하는 기술.
- 별도의 요청없이 데이터를 주고받을 수 있다.
- 채팅이나 주식보고서와 같은 곳에서 사용.
- 교환 플랫폼, 게임 애플리케이션, 챗봇, 푸시알림, 소셜 네트워크, 채팅 애플리케이션 , IOT 애플리케이션 등
- 해당 프로토콜은 정보를 동시에 송수신할 수 있어서 정보교환이 더 빨라짐.
연결 유지 시간
- 서버나 클라이언트 둘 중 하나에 의해 종료되거나 시간초과에 의해 닫힐 때까지 열린상태로 유지됨.
- 연결이 종료될 때까지 동일한 채널을 사용하여 통신이 수행됨.
- 메시지는 양방향으로 교환됨.
- 데이터를 암호화할 수 있음.
무엇을 만들까 ?!
양방향 통신 구현 (Chat 앱)
- 채팅 기능 구현을 위해선, 서버에 접속된 모든 클라이언트들에게 메시지를 전송하는 기능이 필요.
- 이를 브로드 캐스트 라고함.
- 서버 접속 및 연결 해제 정보와 접속한 사용자 이름, 메시지를 모든 클라이언트에게 전송하는 간단한 채팅기능을 구현.
기능 상세
서버에 새로운 유저 접속하거나 연결 해제시, 접속된 모든 클라이언트 유저에게 접속 및 해제 사실과 현재 접속된 전체 유저수를 알린다.(브로드캐스트 한다)
- 유저 접속시 : “새로운 유저 접속 [ 현재 : X 명 ]
- 유저 퇴장시 : “유저 연결 해제 [ 현재 : X 명]
- 채팅 입력 시 닉네임과 메시지를 출력. (모든 클라이언트에게 브로드 캐스트)
Server 및 Client 구현 과정
- 웹 소켓 통신을 주고받을 서버와 클라이언트가 필요.
- 실습에서는 Node.js 의 express.js 프레임워크를 사용.
[Server] Node.js의 express.js 프레임워크를 사용해 서버 구축
서버 구축 프레임워크 (express) 설치
> project directory
npm init
npm i express
/에 index.js 작성하기
const express = require("express");
const app = express();

app.use(express.static("front"));

app.listen(8000, () => {
  console.timeLog(`Server Listening on port 8000`);
});
/에서 node index.js 명령어를 실행 후, 크롬에서 localhost:8000 접속 후 서버 테스트
[Server] ws 웹 소켓 라이브러리를 사용해 간단한 WebSocket 통신 구현
/에서 npm i ws
index.js에서 ws 모듈 불러와 8001번을 통해 접속하는 코드 추가
const express = require("express");
const { WebSocketServer } = require("ws");
const app = express();
app.use(express.static("front"));
app.listen(8000, () => {
console.timeLog(`Server Listening on port 8000`);
});
const wss = new WebSocketServer({ port: 8001 });
wss.on("connection", (ws) => {
ws.on("message", (data) => {
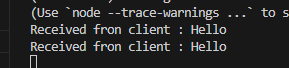
console.log(`Received fron client : ${data}`);
});
});[Client] /에 front라는 폴더 만들고, index.html 작성하기
<!DOCTYPE html>
<html lang="en">
<head>
    <meta charset="UTF-8">
    <meta name="viewport" content="width=device-width, initial-scale=1.0">
    <title>Web Socket 실습</title>
</head>
<body>
    <h1>Web Socket 실습 과제</h1>
</body>
</html>
[Client] 클라이언트(index.html)에서, 버튼을 만들고, 버튼 클릭 시 ‘hello’메시지를 웹소켓을 통해 서버로 보내는 코드 추가
- 이때, WebSocket 생성자가 자바스크립트에 내장되어 있기 때문에 이를 사용해 구현.
<!DOCTYPE html>
<html lang="en">
  <head>
    <meta charset="UTF-8" />
    <meta name="viewport" content="width=device-width, initial-scale=1.0" />
    <title>Web Socket 실습</title>
    <script>
      const ws = new WebSocket("ws://localhost:8001")

      function sendMsg() {
          ws.send("Hello");
      }
    </script>
  </head>
  <body>
    <h1>Web Socket 실습 과제</h1>
    <button onclick="sendMsg()">전송</button>
  </body>
</html>
서버 재실행 후, 클라이언트에서 전송 버튼을 누르면 8001번 포트를 향해 메시지를 보내고, 이를 서버에서 수신.
최종 코드
- https://hudi.blog/websocket-with-nodejs/ 블로그 게시글 참고
// 클라이언트
<!DOCTYPE html>
<html lang="en">
  <head>
    <meta charset="UTF-8" />
    <meta name="viewport" content="width=device-width, initial-scale=1.0" />
    <title>Web Socket 실습</title>
    <script>
      const ws = new WebSocket("ws://localhost:8001")

      // 메시지 서버로 전달
      function sendMsg() {
        const nickname = document.getElementById("nickname")
        const message = document.getElementById("message")
          ws.send(`${nickname.value} : ${message.value}`);
          message.value = ""
      }

      // 수신한 메시지를 dom에 추가.
      function receiveMessage(event) {
        const chat = document.createElement("div");
        const message = document.createTextNode(event.data);
        chat.appendChild(message);

        const chatArea = document.getElementById("chat-area");
        chatArea.appendChild(chat)
      }

      // 메시지 수신 시 receiveMessage 함수 실행.
      ws.onmessage = receiveMessage;
    </script>
  </head>
  <body>
    <h1>SaSao Talk</h1>
    <div
      id="chat-area"
      style="width : 670px; height: 500px; background-color:lightgray; overflow-y: scroll;"
    ></div>
    <div style="margin-top:10px;">
      <input
        id="nickname"
        placeholder="닉네임"
        style="width: 100px;  height:30px"
      />
      <input
        id="message"
        placeholder="메시지를 입력하세요."
        style="width: 500px; height:30px"
      />
      <button style="line-height:30px" onclick="sendMsg()">전송</button>
    </div>
  </body>
</html>
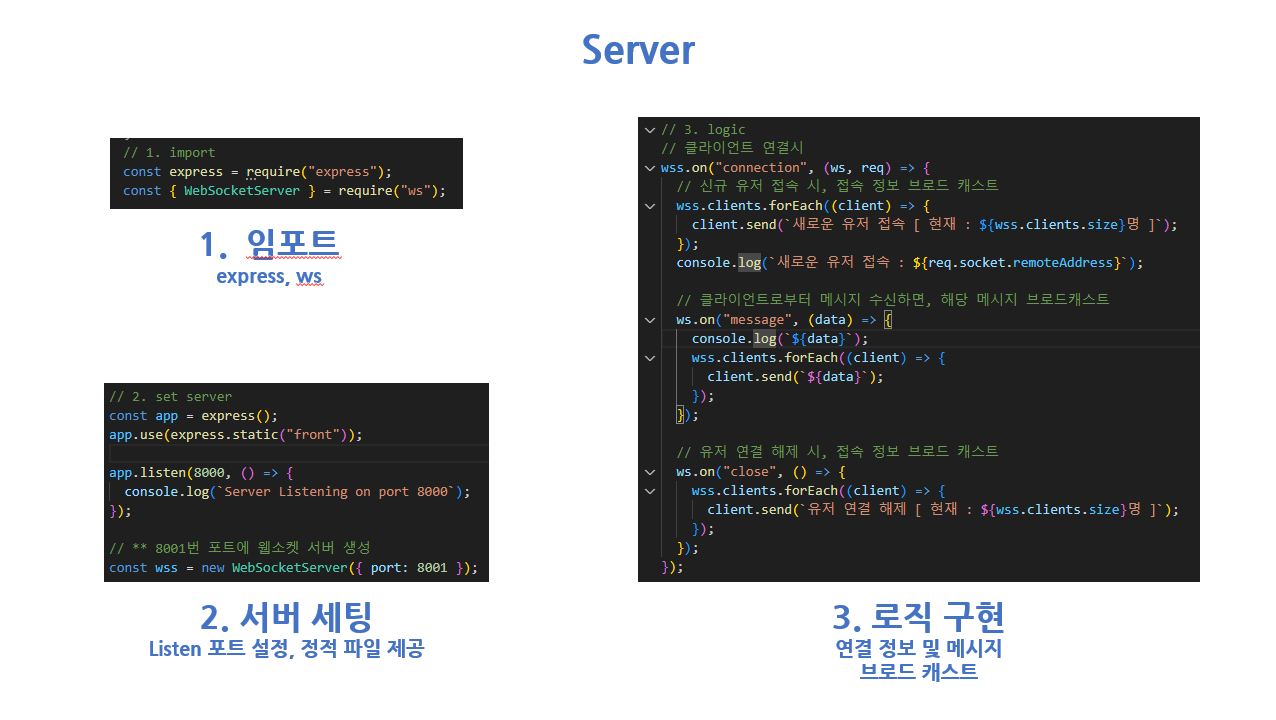
// 서버
const express = require("express");
const { WebSocketServer } = require("ws");
const app = express();

app.use(express.static("front"));

app.listen(8000, () => {
  console.log(`Server Listening on port 8000`);
});

const wss = new WebSocketServer({ port: 8001 });

// 클라이언트 연결시
wss.on("connection", (ws, req) => {
  // 신규 유저 접속 시, 접속 정보 브로드 캐스트
  wss.clients.forEach((client) => {
    client.send(`새로운 유저 접속 [ 현재 : ${wss.clients.size}명 ]`);
  });
  console.log(`새로운 유저 접속 : ${req.socket.remoteAddress}`);

  // 클라이언트로부터 메시지 수신하면, 해당 메시지 브로드캐스트
  ws.on("message", (data) => {
    console.log(`${data}`);
    wss.clients.forEach((client) => {
      client.send(`${data}`);
    });
  });

  // 유저 연결 해제 시, 접속 정보 브로드 캐스트
  ws.on("close", () => {
    wss.clients.forEach((client) => {
      client.send(`유저 연결 해제 [ 현재 : ${wss.clients.size}명 ]`);
    });
  });
});
구현 결과
느낀 점
- 주요 기술 중 하나인 Web Socket을 간단하게 이해할 수 있었습니다.
- 프로젝트들에서 많이 쓰일, 채팅 구현의 핵심이 되는 기술이기 때문에 꼭 알아두어야 겠다고 생각했습니다 !!